Our Blog
How- To Tuesday: Cooking With (AP) Style, Making Pizza With The Associated Press Stylebook

I was browsing my copy of The Associated Press Stylebook the other day (because, really, how else could one possibly want to spend a lazy afternoon?), and I found myself in the food guidelines. Among the common culinary conversions and the proper spellings of all sorts of ingredients (from angel hair pasta to johnnycakes, to York peppermint patties), I was excited to find that the editors had included a delicious-looking example of the proper recipe-writing style. I started to drool a little, then I made a grocery list.
Tonight’s menu: PIZZA WITH RAINBOW CHARD, GOAT CHEESE AND EGG.
Hey, if it’s AP Style, it must be good for you.
Posted by Sarah Weber
How-To Tuesday: How to Summon Piethulhu
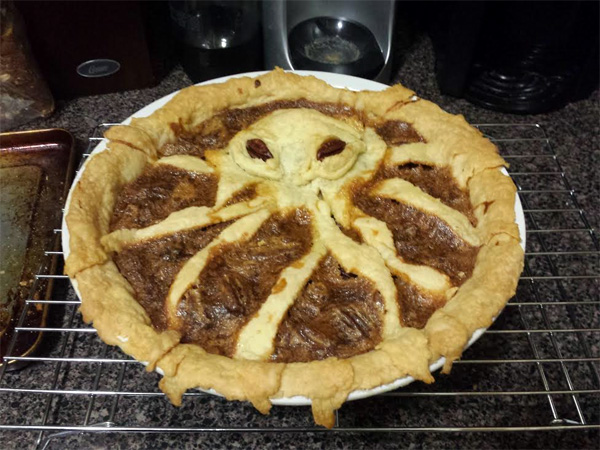
Halloween is over, but the Old Ones won’t sleep for long. You never know when they’re going to burst out from the shadows, from a closet…or from inside your pie!
Ever since California-based artist Sandy Yoo created a dangerously delicious pie last year, I have yearned to attack this food decoration project. Finally, the time has come! Dear Reader, I must reveal the horrific details of this most dreadfully supercool endeavor, so that you can make your own Piethulhu (did you see what I did there?).
What You’ll Need:
– Enough pie dough for two 9-inch pie crusts
– Pecan pie filling (I used my favorite recipe from Joy of Cooking)
– Rolling pin
– Knife
– Extra pecans
I’m a recipe-follower, so your first step is to find your favorite pecan pie recipe. NOTE: Since it’s all about the crust decoration, you can Cthulhu-ize any type of pie, from Chess to Cherry. I was in the mood for pecan pie, so that’s the way I went. Just hold on to a couple of the berries or nuts you’re using for the filling; you’ll need these for the eyes.
Prep the bottom crust in a greased 9-inch pie pan, and add the pie filling. Set aside. Roll out the second pie crust, nice and thin.
Begin by making the tentacles. Using a knife (it doesn’t have to be sharp), cut 8-12 tentacles out of the rolled-out pie dough. A good way to do this is to cut one side straight, one side curvy.
Posted by Suzanne Wallace
Quirk Perks: Get the Cookie Dough Lover’s Cookbook by Lindsay Landis for Only $3.99 All Of November!

THE COOKIE DOUGH LOVER'S COOKBOOK by Lindsay Landis ($3.99)
KINDLE / NOOK / KOBO / IBOOKSTORE
Food blogger Lindsay Landis has invented the perfect cookie dough. It tastes great. It’s egg free (and thus safe to eat raw). You can whip it up in minutes. And, best of all, you can use it to make dozens of delicious cookie dough creations, from cakes, custards, and pies to candies, brownies, and even granola bars. Included are recipes for indulgent breakfasts (cookie dough doughnuts!), frozen treats (cookie dough Popsicles!), and outrageous snacks (cookie dough eggrolls! cookie dough fudge! cookie dough pizza!).
Posted by Eric Smith
Recipe: Blackberry Mint Shortcakes
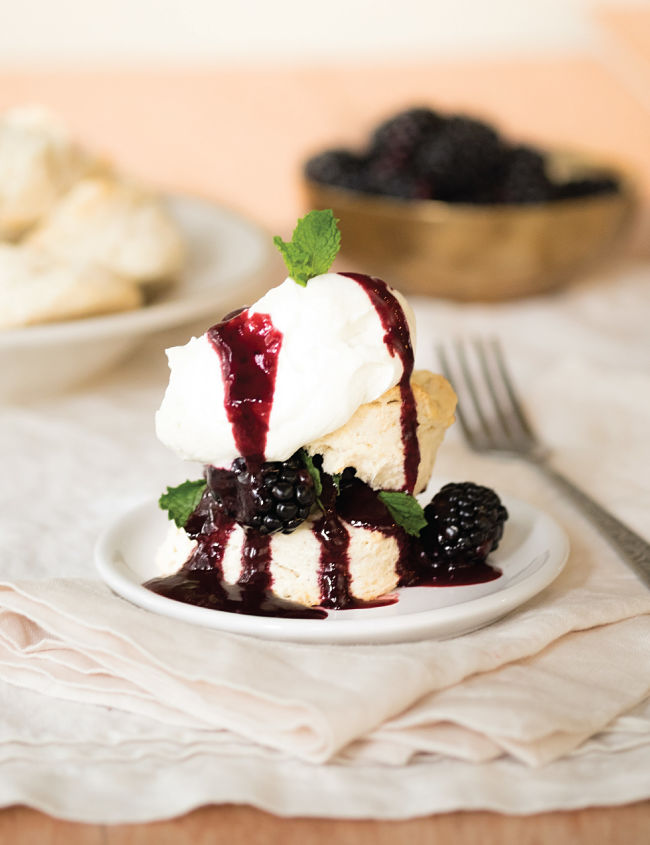
Excerpted from our Making Dough cookbook by Russell van Kraayenburg.
YIELD: 6 shortcakes | PREP TIME: 1 hour | BAKE TIME: 12 minutes
Ingredients
1 pound prepared Biscuit Dough
1 cup heavy cream
5 sprigs fresh mint
4 ounces granulated sugar, divided
12 ounces blackberries, pureed, plus 12 ounces whole berries
1 tablespoon fresh mint leaves, finely chopped
½ teaspoon lemon juice
½ teaspoon vanilla extract
Directions
1. Preheat oven to 425°F. Cut biscuits and bake according to the instructions on page 28, about 12 minutes or until lightly golden. Set aside.
2. Heat heavy cream and mint sprigs in a small saucepan over medium-high heat, until cream reaches the scalding point (180°F on a clipped-on thermometer); it will begin to steam and appear slightly frothy. Transfer to the refrigerator and let steep for 1 hour, until cold.
3. Meanwhile, prepare the blackberry sauce: bring pureed blackberries, half of the sugar, chopped mint, lemon juice, and vanilla to a boil in a medium saucepan. Reduce heat slightly to maintain boil and cook for about 3 to 5 minutes, until thickened. Strain liquid through a fine-mesh sieve into a bowl; discard any blackberry seeds. Set aside to cool.
4. Strain steeped cream through a fine-mesh sieve into a large mixing bowl; discard mint leaves. Whip cream with an electric mixer on high speed while slowly adding the remaining sugar, until stiff peaks form. Note: This will take longer than normal whipped cream, up to 10 minutes, because of the oils from the mint leaves. Set aside in the refrigerator.
5. Assemble the shortcakes: Cut biscuits in half to create two rounds. Cover each bottom half with blackberries and blackberry sauce. Top with the top halves. Spoon whipped cream on top and drizzle with a little more blackberry sauce before serving.
Posted by Russell van Kraayenburg
Recipe: Biscuit Dough
Excerpted from our Making Dough Cookbook by Russell van Kraayenburg.
YIELD: 1 pound | PREP TIME: 20 minutes | BAKE TIME: 12 minutes
Ingredients
6 ounces cake flour
2 ounces bread flour
1 teaspoon salt
4 teaspoons baking powder
3 ounces (6 tablespoons) unsalted butter, cold
½ cup plus 2 tablespoons milk
Mixing the Dough
There are two ways to mix biscuit dough: by hand or using a food processor.
By-Hand Method
1. Mix flours, salt, and baking soda in a large bowl.
2. Chop butter into 1/2-inch cubes. Add to flour mixture.
3. Using your fingers or a pastry cutter, pinch or cut butter into flour, breaking it into pieces about the size of coarse cornmeal. If using your hands, work quickly to prevent butter from melting.
4. Add milk and stir 10 to 20 times with a wooden spoon, until dough just begins to come together.
5. Place dough on a very lightly floured surface. Knead 4 to 5 times, until it just holds its shape. Take care not to knead the dough too much or add.
Food Processor Method
1. Pulse flours, salt, and baking soda in the bowl of a food processor to combine.
2. Chop butter into 1/2-inch cubes. Add to flour mixture. Pulse for 1 to 2 seconds 8 to 12 times, until mixture resembles coarse cornmeal.
3. Add milk and pulse 2 to 4 times, until dough begins to come together. It will form a few large chunks and many small ones.
4. Transfer dough chunks to a very lightly floured surface and push together. Knead 3 to 5 times, until dough just holds its shape. Take care not to knead the dough too much or add too much flour, which can make the biscuits tough.
Why Cake Flour?
The American South enjoys a growing season that is relatively long and free of harshly cold weather, so less hardy varieties of wheat can be grown there. The resulting flour has a lower protein content, which is responsible for the cakey biscuits associated with that region. The similarly low protein content in cake flour will consistently produce these classic soft biscuits.
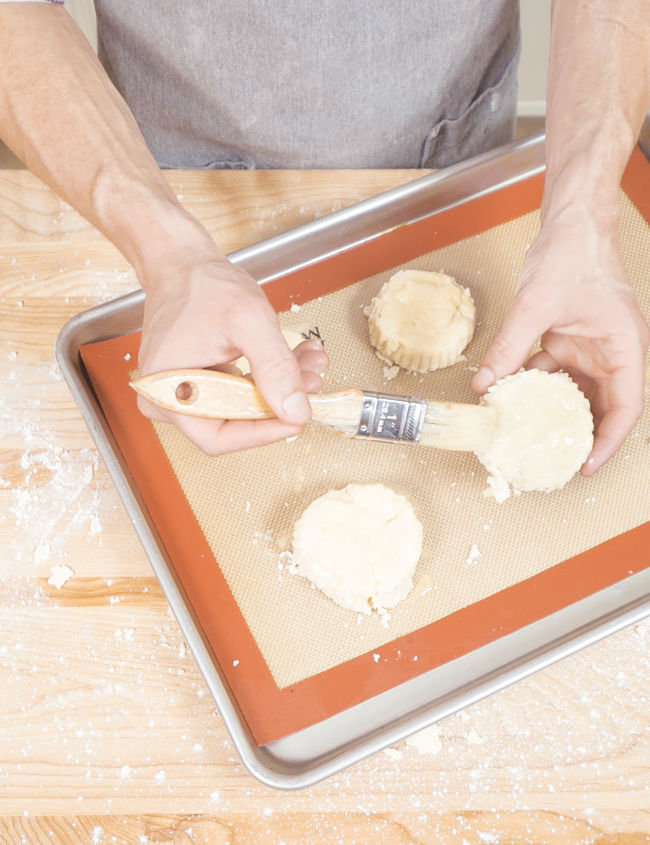
How to Handle Leftover Dough
When using a cookie or biscuit cutter to cut out round biscuits, you’ll inevitably have leftover dough. Instead of kneading the leftover pieces together before rerolling the dough, stack them in layers and then roll the stack. Every time you knead or roll dough, it will become tougher. Stacking it helps delay the toughening.
Storage
Bake immediately, or store in an airtight container. Refrigerator: 2 days. Freezer: 1 month.
Qualities of Good Biscuit Dough
THE DOUGH: Biscuit dough should be dry but easy to manipulate. You should also see small dots of butter throughout the dough.
THE PASTRY: Once baked, biscuits should be tender. The outside crust should be firm and crumble easily, and the crumb inside should be soft.
Adding Mix-Ins
Throwing in some mix-ins—such as herbs or spices, lemon zest, a small pile of cheese, or a big pile of bacon—is a snap. Biscuit dough can handle it! So long as your add-ins are dry, they won’t affect the dough ratio.
Making Classic Butter Biscuits
Position a rack in the center of the oven and preheat oven to 425°F. On a lightly floured surface, roll prepared dough with a rolling pin until ¾ inch thick. Cut out 2½-inch disks with a cookie or biscuit cutter, or simply pull off small handfuls of dough for a more rustic look. Stack pieces of leftover dough, roll dough again, and cut out more disks. Repeat until all the dough is used. Place biscuits on a parchment paper–lined baking sheet spaced at least 1 inch apart. Brush tops with melted butter. Bake for 12 minutes, until tops are just golden. Let biscuits cool on the pan
for 1 minute before transferring to a wire rack. Serve warm.
Posted by Russell van Kraayenburg
Recipe: Duck Fat Biscuits with Tarragon Gravy
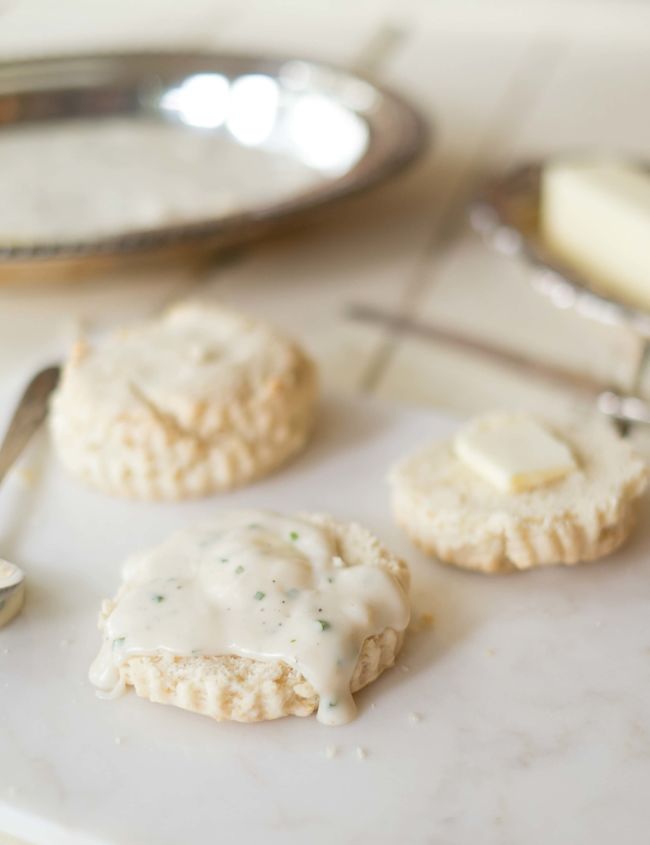
Excerpted from our Making Dough cookbook by Russell van Kraayenburg.
YIELD: 6 biscuits | PREP TIME: 30 minutes | BAKE TIME: 12 minutes
Ingredients
1 pound Biscuit Dough, prepared as at left
3 ounces cold, chopped duck fat
2 ounces (4 tablespoons) unsalted butter
½ small white onion, sliced
1 ounce all-purpose flour
2 cups whole milk
2 teaspoons salt
1 teaspoon ground black pepper
2 teaspoons fresh tarragon, diced
2 teaspoons chives, thinly sliced
Directions
1. Preheat oven to 425°F. Prepare biscuits as described, but replace butter with duck fat. Bake as instructed.
2. While biscuits bake, make the gravy: melt butter in a large skillet over medium heat. Add onions and cook, stirring constantly, for about 8 minutes, until translucent. Reduce heat to low and add flour. Cook, stirring constantly, for 2 minutes so that the flour flavor cooks out.
3. Pour in milk while stirring. Increase heat to medium and bring mixture to a boil. Cook for 5 to 10 minutes, until thick. Remove from heat and add salt, pepper, tarragon, and chives.
4. Serve biscuits with warm gravy.
Variation
Bacon Fat Biscuits
Using a different fat can dramatically affect the flavor of a biscuit. See for yourself: Substitute bacon fat for the duck fat and omit the chives and tarragon. This variation makes a more traditional biscuits and gravy dish.
Posted by Russell van Kraayenburg