DIY: Make a Snug-Read Wearable Blanket!
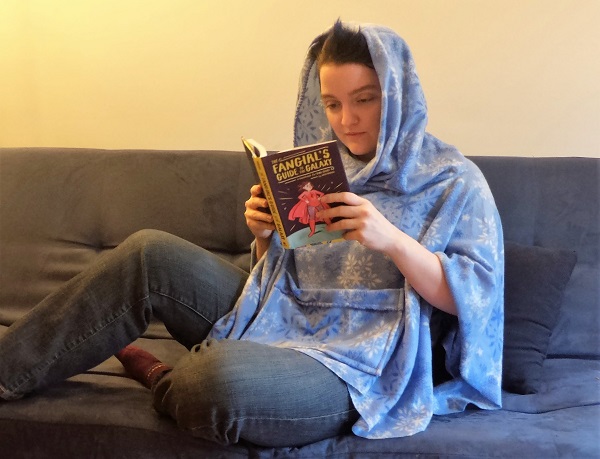
If you’re ready to get your geeky hygge on, this cozy reading gear is for you. Wearable blankets have been very popular for the last few years, but a snug-read has all the benefits of a cozy blanket, a hooded sweatshirt, and a thick scarf without the hassle of trying to wear all three at once.
First, gather your materials:

• Sharp scissors
• Fleece fabric (a large fleece blanket works well, or a piece of fleece at least six feet square’)
• Needle & thread
• Scrap paper & marker
• Tape Measure
Plan your fleece: First, measure out the pieces of your fleece. Altogether you’re going to cut and create 3 pieces: the body, the hood, and the pocket. For the hood, you’ll want to measure out a rectangle that measures 36×20 inches. The pocket can be any size, but to fit an average book or journal you’ll want it to be at least 12×9 inches. The rest of your fleece will be the body of your poncho!

Measure and cut your fleece: Measure 20 inches in along one edge of your fleece. If your fleece is a square, you can measure along any side; if it is a rectangle, measure along one of the shorter sides. Cut the strip for the hood, any remainder will be your pocket.
Pro-tip: Arrange your pieces measuring from the outside edges of the fabric as shown. When you have a pre-cut straight edge or selvage edge to work off of, use it!

Trim the body and cut a neck hole: The body of your poncho has been cut, now round off the corners so that all the edges are smooth. Next find the center of the body piece and mark it. Trace a 15 inch line centered on that point that runs parallel to the longer side of the body (if your body is a square, then any side is fine). Now trace a 3-inch line perpendicular to the first, also centered on that point. Cut along each line as shown.

Sew your hood: Most fleece is the same on both sides, but if yours has a pretty print on only one side, that is the “right side” of your fabric. Fold your hood so that the “right sides” are touching and the “wrong sides” are facing out. Pin the shorter ends of your hood rectangle together, and stitch to secure in place. This will ensure that the pretty finished seam will be on the outside, and the seam allowance will stay on the inside.

Attach your hood: With the “right side” of your hood facing the “right side” of the body, pin your hood to the body with the hood seam centered on one end of your 3-inch cut. Pin all the way around and adjust the edges to be sure you will be able to stitch smoothly and evenly all the way around. Once you are satisfied with the pinning, stitch your hood in place.

Sew and attach your pocket: Trim your pocket so that it is exactly the size you want PLUS 2 inches in length and width. Fold over one inch along the long edge toward the right side and stitch in place. This will be the brim of your pocket. Turn your fabric over and fold 1 inch over along the 3 remaining sides. Stitch these in place to form a clean finished edge.

Pin the pocket: Once all the stitching on the pocket is done, pin the pocket in a comfortable place on your poncho with the long edge parallel to the long edge of the body. Stitch along the sides and the bottom of your pocket, leaving the top open for all your carrying needs.

Finish and enjoy!: Trim any extra threads, excess seam allowance, or rough edges to your projects before wearing. Grab a book and mug of something warm, and get ready for the coziest night of reading in your life!

Share your pics! We’d love to see action shots of you in your snug-read @quirkbooks on Instagram and Twitter!


