Holiday DIY: Paperbacks to Paper Chains
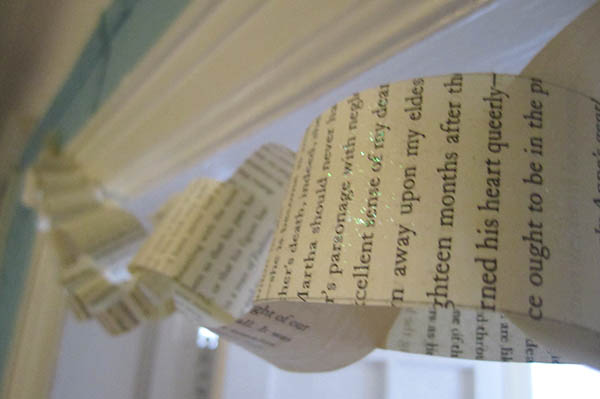
A book is a terrible thing to waste, but what do you do with one that’s damaged? Upcycle it into festive decorations, of course! Use pages from any dilapidated book to create a length of beautiful paper chain. A traditional craft for the holiday season here in the Western world, paper chains are a way crafters of any age (or DIY skill level) can make their own decorations. You can even customize your chain with color, sparkles, or pictures! Paper chains are a fun, efficient way to make any space festive and magical.

Here are a few tips for making your very own paperback chain quickly and easily.
First, gather your materials:
- A book – a damaged or old book works perfectly
- A ruler or straight edge
- Scissors
- Invisible tape – we prefer tape, but you could use glue or staples
- Optional: glitter paint, stick on jewels, etc.
Divide your pages into strips for paper chains
Strips of paper should be at least an inch thick if you’re going to put yours in a high traffic area. Use a pencil to trace the lines and they will be almost invisible in your finished project.
Pro-tip: most craft rulers are at least an inch wide, so you can get evenly sized strips by simply tracing both sides of the ruler.
Cut several sheets at once to save time
Once you have your strips outlined on the topmost page of your book, gather up several (three to five) pages beneath it and begin cutting carefully. As you cut, check that the edges of each page in the group line up correctly. You want each link in the chain to be as uniform as possible.
Decorate each strip and let dry
Decorate your strips now while they are still flat. For this example we used glitter paint – loose glitter has a tendency to shed when handled, and in making the chain each link is handled enough to shed a copious amount of glitter. Glitter paint solves this problem by making sure all glitter is firmly adhered to each strip. You can also stick on jewels or sequins!
Forge your rings
Bend a strip of paper around into a circle with about an inch of overlap where the ends meet. Use a piece of clear tape to hold the top part of the overlap in place, and your first link has been forged!
Pro-tip: We used tape in this example not only because it is quick and easy, but also because it creates a nearly seamless link and is easy to adjust or repair if necessary (not so with glue or staples). You can of course any method you prefer to forge your links.
Attach your rings
First make two independent rings. Next, thread a strip through the two rings and tape it in place to form a link. Traditionally paper chains are made one link at a time – manipulating a long chain as you continue to add links. No more! By making individual links and connecting them two at a time into chain segments, and then connecting those chain segments in the same way, you make the whole construction process easier and more efficient.
Bonus Round 1: Mini Chains!
Make your paper chain a super deluxe decoration with a link made from a mini chain! Take three to four strips of paper and cut each down the center lengthwise and widthwise, giving you four mini strips. Use these strips to forge a small chain a little longer than the strips you cut for the full sized chain links. Thread the mini chain trough two links of the full-sized chain, and use a mini strip to connect both ends. You have now created a mini chain link for your full-sized chain!
Bonus Round 2: Mounted Bows!
A paper chain is only as festive as how you hang it. Thread a strip through the last link of the chain and tape its ends together to form a teardrop shape. This is now your hanging loop – tape or tack the flat portion in place to hang up your chain. Now you can make paper bows to cover each end! Cut two strips in half and use them to make half-width links. Tape these skinny links around the middle to turn them into figure eights, and then tape one figure eight on top of the other to form a bow. Decorate, and use each bow to cover up the ends of the hanging loops.
Paper chains can be used to decorate any entryway, banister, wall, or cubicle of a coworker who’s away for a few days during the holiday season. Get crafty and enjoy!


