DIY Harry Potter Halloween Lantern How-To
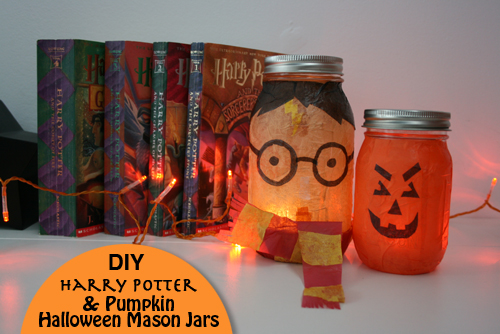
Halloween decorations don't have to mean store-bought candles and cobwebs! Quirk gets crafty and shows you how to make wondefully spooky mason jars that will help any home feel the Halloween spirit.
DIY Pumpkin Mason Jar:

1. Cut strips of the orange tissue paper using the measurement from the length of the bottom of the lip of the jar to the under side of the jar.

2. Draw your desired pumpkin face on the black tissue.
3. Cut out the pieces for the face of the pumpkin.

4. Brush your choice of glue on the Mason jar in a thin layer roughly the width of the orange strip.
5. Apply the strip and using your hand or a dry brush gently smooth it out. (Texture in the tissue paper is fine, adds character.)
6. Repeat until you’ve covered the outside surface of the pumpkin.

7. Glue the pumpkin face on using the same method.
8. Decorate the lid with tissue paper using the same method as the jar or with ribbon, or paint. (Optional)
9. Cut a circle piece of tissue paper to cover the bottom of the jar if you want a clean finish. (Optional)

10. Place a battery operated light inside and behold you’re boo-tiful pumpkin.
DIY Harry Potter Mason Jar:

1. Select the color of tissues you want to use for each piece (base, hair, glasses, eyes, nose, mouth, scarf).

2. Cut the base color into strips using the measurement from the length of the bottom of the lip of the jar to the under side of the jar
3. Cut out Harry Potter’s hair in a long piece the width of the neck of the bottle and then cut it into four sections.

4. Cut out Harry Potter’s glasses in pieces: 2 circles for lenses, 2 legs, 1 bridge of nose piece. (If cutting the center out of the circles is too difficult cut into semicircles and glue them together on the face.)
5. Draw on desired colored tissue paper a lightning bolt, nose (rectangle), mouth (small rectangle for top lip, larger rectangle for bottom lip).
6. Cut out lightning bolt, nose, mouth, and eyes if not using googly eyes.

7. Brush your choice of glue on the Mason jar in a thin layer roughly the width of the tissue paper strip cut for the base.
8. Apply the strip and using your hand or a dry brush gently smooth it out. (Texture in the tissue paper is fine, adds character.)
9. Repeat until you’ve covered the outside surface for Harry Potter’s face.

10. Glue the lightning bolt, then two front and two back pieces of hair.
11. Glue glasses, nose, and mouth. (Leave space for scarf)
12. Glue eyes.
13. Set the jar upside down to dry.

14. Make the scarf by cutting a long strip of burgundy tissue paper about 4” in height. Cut yellow strips roughly the height of the scarf. Using your glue gently brush the pieces of yellow paper and glue them to the scarf. (Make sure you don’t glue the scarf down to your working surface.)

15. Cut the scarf in half, lengthwise so that you have two long scarves.
16. Glue the tip of one scarf slightly off to the right of center on the front of HP’s face. Wrap/glue the scarf around the bottom. Don’t worry about the bottom overhang.

17. Fold the piece left over in the front upwards.
18. Wrap the second scarf around the first one slightly lower.
19. If you want the scarf to look a bit windblown glue a small bit of the leftover piece onto the cheek and let the rest hang.
20. Fold down the earlier piece that had been folded up.
21. Cut fringe into the end pieces of the scarf. (Optional)
22. Glue down the overhang at the bottom to the bottom of the jar.
23. Cut a circle piece of tissue paper to cover the bottom of the jar if you want a clean finish. (Optional)
24. Leave upside down to dry.
25. Wrap with tissue paper, ribbon or paint lid to match hair. (Optional)
26. Add lights inside and introduce your new friend to your books.


