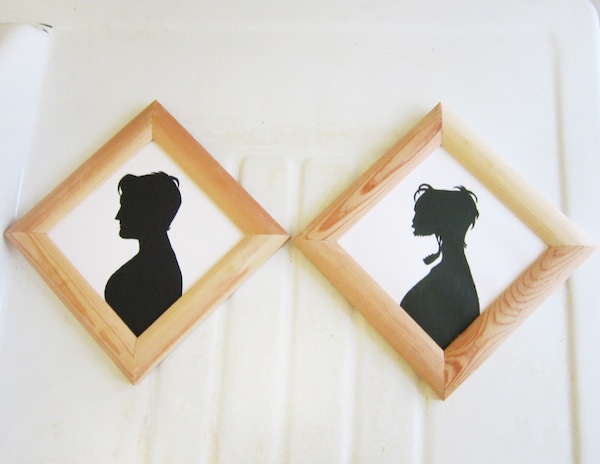
Remember Loved Ones (and Zombies) with DIY Silhouettes
Remembering loved ones nowadays means sharing photos online, but for folks in Regency-Era England, keepsake images were a little harder to come by. One of the many skills that could establish a young lady as thoroughly “accomplished” – aside from weapons use and hand-to-hand combat with the undead – was drawing. Drawing a silhouette was an affordable way for even young ladies without family, connections or fortune to keep a likeness of a friend or family member.
In Jane Austen’s time, silhouettes were made by shining light on a person in profile against paper, tracing the lines, and using that outline for cutting paper. In this modern version we simplify the process so anyone can immortalize a loved one as they are… or as a zombie!

You Will Need:
- A photo (shoulders up, taken in profile)
- Heavy white paper or cardstock
- Craft knife
- Sharp pencil
- Clean eraser
- Matte-finish paint (Any dark color will work, but black is traditional)
- Fine tipped paint brush
- Picture frame
- Masking tape
- Cardboard

1. First, choose your photo. Try to pick an image with a solid-color background and good lighting. Print your photo out and tape it to your cardboard and cut it out carefully using your craft knife. Try to retain as much detail as possible – distinctive cowlicks and noses are what make your project really resemble the subject.

2. Cut your cardstock to fit the frame you will use, and trace your cut out onto it lightly with a sharp pencil. Once you have traced your cut out, put it aside and go over any light areas so can see the lines clearly. (You will erase these marks later so make them gently!)

3. Now you can make your zombie version: Using the cut out you put aside, lightly sketch some zombie-like details. For this version, I decided to collapse the chest, disconnect the jaw, and remove most of the hair. Cut away your deletions carefully and trace your zombie cut out on a fresh, matching piece of cardstock.

4. Add a little extra detail to your zombie. For this one I chose to make a few small changes: removing most of the nose, adding jagged teeth, and showing tears in the ligaments holding the jaw to the head. These details go a long way to making your zombie look truly undead.

5. Now you are ready to paint! With a fine-tipped brush, fill in the details around the edges of your silhouette. Once you have completed the details, you can use a larger brush to fill in the middle. I used black for the more traditional portrait and a swampy green for the zombie version.

6. Now leave your silhouettes to dry for a few hours. I let mine dry overnight just to be sure.

7. Once the paint is dry, use your clean eraser to remove any stray pencil marks. Put your silhouettes in matching frames to give them a finished look.
You are now ready to hang a sweet remembrance of that special someone before (and after) they became a member of the undead horde!